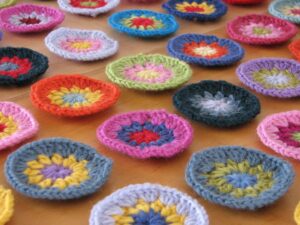
Unravel the mysteries of crochet magic with the simple technique of the magic circle. This enchanting method allows you to create seamless and perfectly circular crochet projects, from cozy beanies to intricate doilies. Mastering the magic circle may seem daunting at first, but with a few quick tips and tricks, you’ll be weaving spells of your own in no time.
Choosing the Right Yarn and Hook Size
When it comes to crochet projects, is essential for creating the desired outcome. The yarn thickness and texture will impact the look and feel of your finished piece, while the hook size will determine the tightness and overall size of your stitches. To ensure success with your projects, consider the following tips:
Choosing the right yarn:
- Consider the weight of the yarn – from thin lace weight to thick super bulky
- Think about the fiber content – cotton for durability, wool for warmth, acrylic for easy care
- Take into account the color and texture of the yarn to match your project
Choosing the right hook size:
- Refer to the yarn label for recommended hook sizes
- Experiment with different hook sizes to achieve the desired tension
- Remember that smaller hooks create tighter stitches and larger hooks create looser stitches
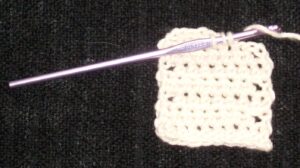
Creating the Initial Loop
To create the initial loop for crocheting a magic circle, start by holding the tail of the yarn in your non-dominant hand. Take the working yarn and wrap it around your fingers to create a loop. Insert your crochet hook under the first loop and pull up a loop of the working yarn through the loop on your fingers. This will create the starting loop for your magic circle.
Next, chain 3 to serve as the first double crochet stitch in the circle. This chain will count as your first stitch in the round. To continue the circle, double crochet a certain number of stitches into the center of the ring, depending on the pattern you are following. Use the working yarn to pull up a loop through the center of the ring, yarn over, and pull through two loops on your hook twice to complete the double crochet stitch.
Repeat the process of double crocheting into the center of the ring until you have the desired number of stitches for your project. Once you have completed all the necessary stitches, pull on the tail of the yarn to close up the magic circle. Your initial loop is now complete, and you can begin working in the round to create your crochet project. With practice, you’ll master the art of the magic circle and be able to create beautiful and seamless crochet pieces.
Single Crochet Stitches in the Magic Circle
Once you have created a magic circle, you can start working on single crochet stitches to create a beautiful and neat crochet project. Single crochet stitches are the most basic and commonly used stitches in crochet, and they are perfect for adding texture and definition to your work.
To crochet single crochet stitches in a magic circle, follow these steps:
- Insert your hook into the magic circle.
- Yarn over and pull up a loop through the magic circle.
- Yarn over again and pull through both loops on your hook.
Repeat these steps for as many single crochet stitches as your pattern requires, and you will have a lovely and well-defined crochet project in no time!
Adjusting the Circle’s Size as Needed
When crocheting a magic circle, it’s important to be able to adjust the circle’s size as needed to achieve the desired shape and dimensions for your project. One way to do this is by gently pulling on the loose end of the yarn to tighten the circle or loosening it to make the circle larger. This technique allows for flexibility and customization in your crochet work.
Another method for adjusting the circle’s size is by adding or removing stitches in the initial round. By increasing or decreasing the number of stitches, you can control the circumference of the circle. This can be especially useful when working on projects that require a specific size or shape, such as hats, amigurumi, or coasters.
Remember to periodically check the size of your circle as you crochet to ensure that it meets your project’s requirements. Making small adjustments along the way will help you achieve the perfect circle for your crochet piece. With practice and patience, you’ll be able to master the art of adjusting the circle’s size to suit your needs.
Finishing Off and Weaving in Ends
After you have finished crocheting your magic circle, it’s important to properly close it off and weave in the ends to secure your work. This final step will give your project a clean and finished look. Follow these easy steps to complete your magic circle:
- Closing the Circle: To close off the magic circle, slip stitch into the first stitch made in the circle. This will form a complete round and secure the center of your project.
- Weaving in Ends: Weaving in ends is essential to prevent your work from unraveling. Using a yarn needle, carefully weave the loose ends of the yarn through the stitches on the back of your work. Trim any extra yarn to ensure a tidy finish.
- Final Inspection: Once you have closed off the magic circle and woven in the ends, take a moment to inspect your work. Make any necessary adjustments or snip any stray yarn to perfect your project.
Future Outlook
As you can see, mastering the magic circle technique in crochet opens up a world of endless possibilities for creating beautiful and intricate designs. With a little practice and patience, you’ll soon be incorporating magic circles into all of your crochet projects with ease. So grab your hook and yarn, and let your imagination run wild as you embark on your crochet journey filled with magic circles and enchanting creations. Happy crocheting!